Convert video files using FFMPEG in Linux

Convert MKV to MP4

ffmpeg -i video_file.mkv output_file.mp4

If you only want to convert MKV to MP4 then you will save quality and a lot of time by just changing the containers. Both of these are just wrappers over the same content so the CPU only needs to do a little work. Don’t re encode as you will definitely lose quality.

It’s very straight forward using ffmpeg:

ffmpeg -i LostInTranslation.mkv -codec copy LostInTranslation.mp4

Here, you are copying the video codec and audio codec so nothing is being encoded.

To convert all MKV files in the current directory, run a simple loop in terminal:

for i in *.mkv; do
    ffmpeg -i "$i" -codec copy "${i%.*}.mp4"
done

Note: If you get an error like this:

opus in MP4 support is experimental, add '-strict -2' if you want to use it.
Could not write header for output file #0 (incorrect codec parameters ?): Experimental feature

use

for i in *.mkv; do
ffmpeg
-i "$i" -codec copy -strict -2 "${i%.*}.mp4" done


Convert MP4 to AVI

In order to just copy the video and audio bitstream, thus without quality loss:

ffmpeg -i filename.mkv -c:v copy -c:a copy output.avi

If you want FFmpeg to convert video and audio automatically:

ffmpeg -i filename.mkv output.avi

Blinking LED With Arduino Nano

Things you need: Arduino Nano, 3V LED, 100 Ohm Resistor

To power up the Arduino Nano board, you can use USB cable or an external power supply (7V ~ 12V DC) by connecting positive pin to VIN and and negative to the ground. Please see my previous post about powering up Arduino Nano here: https://blogs.webservice.lk/2020/03/17/powering-up-arduino-nano/

To connect LED, use LED’s positive end to the one end of resistor and other end to Arduino Nano’s digital pin 13 & negative end to the  one of Arduino Nano’s ground pin. Please see the picture above.

Now circuit making part is done, Let’s do the programing.

int ledPin =  13;// the number of the LED pin

void setup() {
  // set the digital pin as output:
  pinMode(ledPin, OUTPUT);
}

void loop() {
  digitalWrite(ledPin, HIGH);   // turn the LED on (HIGH is the voltage level)
  delay(1000);                       // wait for a second
  digitalWrite(ledPin, LOW);    // turn the LED off by making the voltage LOW
  delay(1000);
}

Upload above sketch to the Arduino Nano and see the result. Led will blink with the 1 second delay.

Powering Up Arduino Nano

The Arduino Nano is a small, complete, and breadboard-friendly board based on the ATmega328P (Arduino Nano 3.x). It has more or less the same functionality of the Arduino Duemilanove, but in a different package. It lacks only a DC power jack, and works with a Mini-B USB cable instead of a standard one.

The Arduino Nano can be powered via the Mini-B USB Jack (5V) connection. 


The Arduino Nano accepts the 7V to 12V input power from the Vin pin (pin30).


If you want to supply regulated power, then a 5V regulated adapter needs to feed the +5V pin (pin27) instead.


The power source is automatically selected to the highest voltage source if you input multiple power inputs.

Simple REST API php/mysql

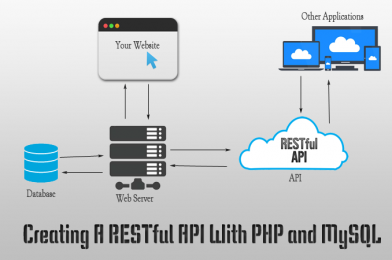
REST meaning of “REpresentational State Transfer”. It is a concept or an architecture for transfer information over the internet with unique and standard structure specially designed for it. REST concepts/architectures are referred as resources. A representation of a resource must be stateless and it is usually represented in JSON format.

API meaning of “Application Programming Interface”. It is a set of rules/methods that allows one piece of software application to talk to another with specially defined rules/methods with its own structure. Those “rules/methods” can include for create, read, update and delete operations.

Here i have explained, How to make a REST API for a CRUD (CREATE, READ, UPDATE, DELETE) application. For example, i am going to explain here;

I am going to use a test_database with the users table.

CREATE TABLE `users` (
  `id` int(11) NOT NULL,
  `first_name` varchar(255) NOT NULL,
  `last_name` varchar(255) NOT NULL,
  `email` varchar(255) NOT NULL,
  `username` varchar(255) NOT NULL,
  `password` varchar(255) NOT NULL,
  `status` int(11) NOT NULL DEFAULT '1'
) ENGINE=InnoDB DEFAULT CHARSET=latin1;
ALTER TABLE `users` ADD PRIMARY KEY (`id`);
ALTER TABLE `users` MODIFY `id` int(11) NOT NULL AUTO_INCREMENT;

Here are some test data to the table, for the testing purpose.

INSERT INTO `users` (`id`, `first_name`, `last_name`, `email`, `username`, `password`, `status`) VALUES
(1, 'John', 'Doe', 'jd@gmail.com', 'john', '2829fc16ad8ca5a79da932f910afad1c', 1),
(2, 'Peter', 'Alex', 'peter@gmail.com', 'peter', '827ccb0eea8a706c4c34a16891f84e7b', 1);

Let’s start to make a simple REST API step by step using PHP/MySQL according to the following;

How to create an user in the database ?
How to read user’s information from the database ?
How to update user’s information in the database ?
How to delete an user from the database ?

Additionally,

How to get all users list from the database ?
How to search users from the database ?

For the database connection i am using my database class discussed in a previous article. https://blogs.webservice.lk/2020/02/28/phpmysql-database-class/

How to create an user in the database ?

To create a user, we need to pass data to the create_user.php file. Here we only allow POST method to transfer data between the API and the application. API will return response in JSON format.

In this JSON response i have used;

response  – to get the status success/unsuccess
message – to describe the status
count – to get the row count in the data result (When fetching rows)
data – to get the fetched data. (Sometimes, insert id for insert operations)

create_user.php

<?php
header("Access-Control-Allow-Origin: *");
header("Content-Type: application/json; charset=UTF-8");
header("Access-Control-Allow-Methods: POST");
require('class.database.php');

$arr = [];
if($_SERVER['REQUEST_METHOD']=="POST"){
    if(isset($_POST['first_name'])) $first_name = $database->escape($_POST['first_name']);
    if(isset($_POST['last_name'])) $last_name = $database->escape($_POST['last_name']);
    if(isset($_POST['username'])) $username = $database->escape($_POST['username']);
    if(isset($_POST['password'])) $password = $database->escape($_POST['password']);
    if(isset($_POST['email'])) $email = $database->escape($_POST['email']);

    if(isset($first_name) && !empty($first_name)){
        if(isset($last_name) && !empty($last_name)){
            if(isset($username) && !empty($username)){
                if(isset($password) && !empty($password)){
                    if(isset($email) && filter_var($email,FILTER_VALIDATE_EMAIL)){
                        $sql = "INSERT INTO `users` 
                        (
                            `first_name`,`last_name`,`username`,`password`,`email`
                        ) 
                        VALUES (
                            '$first_name','$last_name','$username','".md5($password)."','$email'
                        )";

                        $insert_id = $database->insert($sql);

                        if($insert_id>0){
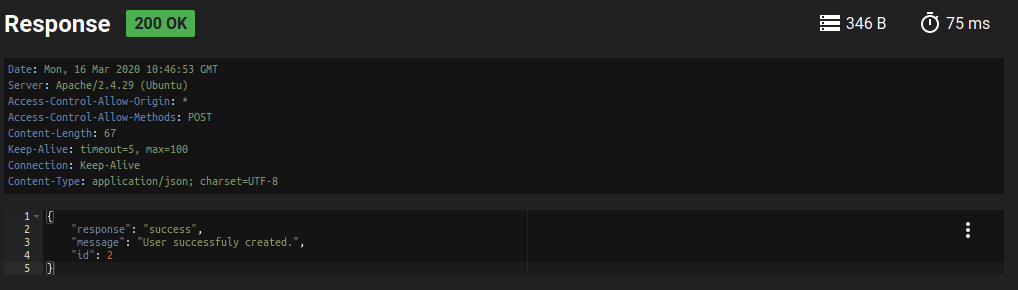
                            $arr = ["response"=>"success","message"=>"User successfuly created.","id"=>$insert_id];
                        }
                        else $arr = ["response"=>"unsuccess","message"=>"Create user failed. ".$database->error()];
                    }
                    else $arr = ["response"=>"unsuccess","message"=>"Valid email required !"];
                }
                else $arr = ["response"=>"unsuccess","message"=>"Password required !"];
            }
            else $arr = ["response"=>"unsuccess","message"=>"Username required !"];
        }
        else $arr = ["response"=>"unsuccess","message"=>"Last name required !"];
    }
    else $arr = ["response"=>"unsuccess","message"=>"First name equired !"];
}
else  $arr = ["response"=>"unsuccess","message"=>"Bad request !"];

echo json_encode($arr);
?>

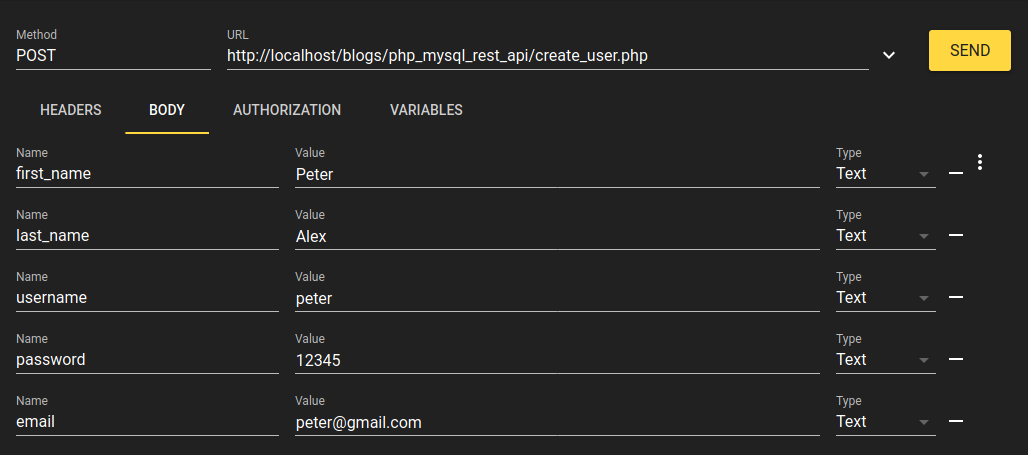
We can test this create_user.php using POSTMAN or any REST API testing tool like RESTer extension installed in Firefox web browser. According to this example, we need to pass First Name, Last Name, Username, Password and the Email to create a new user as below.


How to read user’s information from the database ?

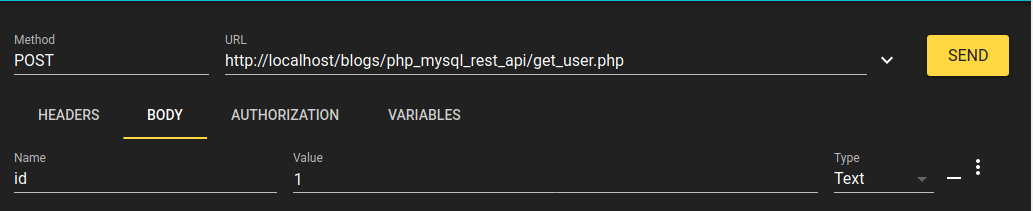
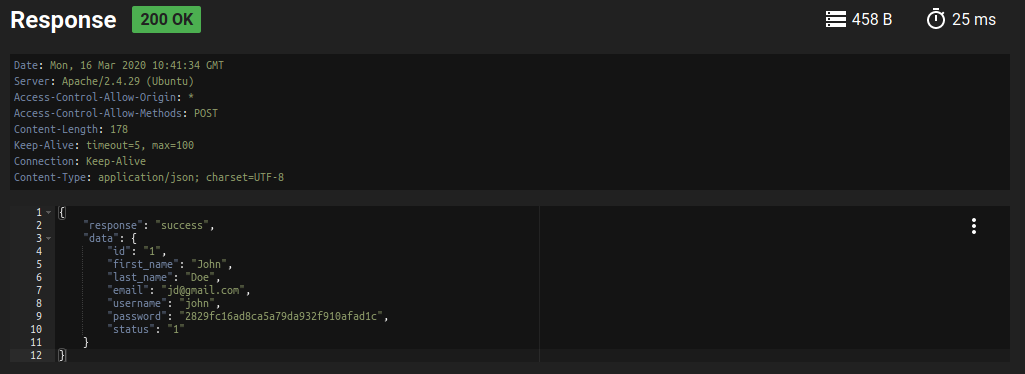
To read information for an user, we need to pass user’s id to get_user.php file and get the result related to the sent user id. Data can be sent only via POST method.

get_user.php

<?php
header("Access-Control-Allow-Origin: *");
header("Content-Type: application/json; charset=UTF-8");
header("Access-Control-Allow-Methods: POST");
require('class.database.php');

$arr = [];
if($_SERVER['REQUEST_METHOD']=="POST"){
    if(isset($_POST['id'])) $id = $database->escape($_POST['id']);

    if(isset($id) && !is_null($id) && $id>0){
        $sql = "SELECT * FROM `users` WHERE `id`='$id'";
        $results = $database->select($sql);
        $count = $database->num_rows($sql);

        if($count>0){
            $arr = ["response"=>"success","data"=>$results[0]];
        }
        else $arr = ["response"=>"unsuccess","message"=>"User not found !".$database->error()];                   
    }
    else $arr = ["response"=>"unsuccess","message"=>"Id required !"];
}
else  $arr = ["response"=>"unsuccess","message"=>"Bad request !"];

echo json_encode($arr);
?>

API will return response in JSON format. Here is the test result for sent id as 1. This will show the result for user id 1.

How to update user’s information in the database ?

To update an user, we need to send the id of the user we need to update and the required data to update in the database.

update_user.php

<?php
header("Access-Control-Allow-Origin: *");
header("Content-Type: application/json; charset=UTF-8");
header("Access-Control-Allow-Methods: POST");
require('class.database.php');

$arr = [];
if($_SERVER['REQUEST_METHOD']=="POST"){
    if(isset($_POST['id'])) $id = $database->escape($_POST['id']);
    if(isset($_POST['first_name'])) $first_name = $database->escape($_POST['first_name']);
    if(isset($_POST['last_name'])) $last_name = $database->escape($_POST['last_name']);
    if(isset($_POST['username'])) $username = $database->escape($_POST['username']);
    if(isset($_POST['password'])) $password = $database->escape($_POST['password']);
    if(isset($_POST['email'])) $email = $database->escape($_POST['email']);

    if(isset($id) && !is_null($id) && $id>0){
        if(isset($first_name) && !empty($first_name)){
            if(isset($last_name) && !empty($last_name)){
                if(isset($username) && !empty($username)){
                    if(isset($password) && !empty($password)){
                        if(isset($email) && filter_var($email,FILTER_VALIDATE_EMAIL)){
                            $sql = "UPDATE `users`SET 
                            `first_name`='$first_name',`last_name`='$last_name',`username`='$username',
                            `password`='".md5($password)."',`email`='$email'
                            WHERE id='$id'";

                            if($database->query($sql)===true){
                                $arr = ["response"=>"success","message"=>"User successfuly updated."];
                            }
                            else $arr = ["response"=>"unsuccess","message"=>"Update user failed. ".$database->error()];
                        }
                        else $arr = ["response"=>"unsuccess","message"=>"Valid email required !"];
                    }
                    else $arr = ["response"=>"unsuccess","message"=>"Password required !"];
                }
                else $arr = ["response"=>"unsuccess","message"=>"Username required !"];
            }
            else $arr = ["response"=>"unsuccess","message"=>"Last name required !"];
        }
        else $arr = ["response"=>"unsuccess","message"=>"First name equired !"];
    }
    else $arr = ["response"=>"unsuccess","message"=>"Id required !"];
}
else  $arr = ["response"=>"unsuccess","message"=>"Bad request !"];

echo json_encode($arr);
?>


How to delete an user from the database ?

To delete an user from the database, we need to pass the id of the user in the database to the delete_user.php file. Here i am not going to delete the user information from the database and used a status field to update the user’s status to the value zero. So status=0 rows are deleted users. [We should not delete important data permanently in our real applications, because these records will very important in one day to audit some database operations.]

delete_user.php

<?php
header("Access-Control-Allow-Origin: *");
header("Content-Type: application/json; charset=UTF-8");
header("Access-Control-Allow-Methods: POST");
require('class.database.php');

$arr = [];
if($_SERVER['REQUEST_METHOD']=="POST"){
    if(isset($_POST['id'])) $id = $database->escape($_POST['id']);

    if(isset($id) && !is_null($id) && $id>0){
        $sql = "UPDATE `users` SET `status`=0 WHERE `id`='$id'";

        if($database->query($sql)===true){
            $arr = ["response"=>"success","message"=>"User successfuly deleted."];
        }
        else $arr = ["response"=>"unsuccess","message"=>"Delete user failed. ".$database->error()];                   
    }
    else $arr = ["response"=>"unsuccess","message"=>"Id required !"];
}
else  $arr = ["response"=>"unsuccess","message"=>"Bad request !"];

echo json_encode($arr);
?>

How to get all users list from the database ?

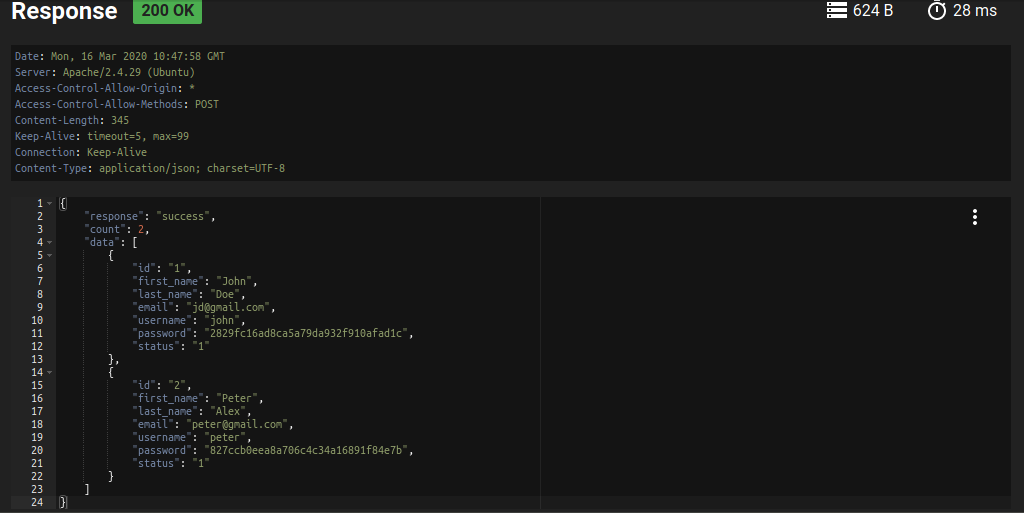
To get all users we can sent request using POST method without any parameters since we don’t want to add any filter to the fetching result. Here i have only returned the rows with status=1. Because status=0 are the deleted rows and we don’t need to show them when fetching users from the database.

get_users.php

<?php
header("Access-Control-Allow-Origin: *");
header("Content-Type: application/json; charset=UTF-8");
header("Access-Control-Allow-Methods: POST");
require('class.database.php');

$arr = [];
if($_SERVER['REQUEST_METHOD']=="POST"){
        $sql = "SELECT * FROM `users` WHERE `status`=1 ";
        $results = $database->select($sql);
        $count = $database->num_rows($sql);

        if($count>0){
            $arr = ["response"=>"success","count"=>$count,"data"=>$results];
        }
        else $arr = ["response"=>"unsuccess","message"=>"No users found. ".$database->error()];
}
else  $arr = ["response"=>"unsuccess","message"=>"Bad request !"];

echo json_encode($arr);
?>

Here is the test result using RESTer extension installed in the Firefox web browser.

How to search users from the database ?

To search users from the database, we can send search parameters to the serach_user.php file. According to this example, we can search users using their First Name, Last Name, Username and Email.

search_user.php

<?php
header("Access-Control-Allow-Origin: *");
header("Content-Type: application/json; charset=UTF-8");
header("Access-Control-Allow-Methods: POST");
require('class.database.php');

$arr = [];
if($_SERVER['REQUEST_METHOD']=="POST"){
    if(isset($_POST['first_name'])) $first_name = $database->escape($_POST['first_name']);
    if(isset($_POST['last_name'])) $last_name = $database->escape($_POST['last_name']);
    if(isset($_POST['username'])) $username = $database->escape($_POST['username']);
    if(isset($_POST['email'])) $email = $database->escape($_POST['email']);

        $sql = "SELECT * FROM `users` WHERE `status`=1 ";

        if(isset($first_name) && !empty($first_name)){
            $sql .= " AND `first_name` LIKE '%".$first_name."%' ";
        }
        if(isset($last_name) && !empty($last_name)){
            $sql .= " AND `last_name` LIKE '%".$first_name."%' ";
        }
        if(isset($username) && !empty($username)){
            $sql .= " AND `username` LIKE '%".$first_name."%' ";
        }    
        if(isset($email) && !empty($email)){
            $sql .= " AND `email` LIKE '%".$first_name."%' ";
        }
        
        $results = $database->select($sql);
        $count = $database->num_rows($sql);

        if($count>0){
            $arr = ["response"=>"success","count"=>$count,"data"=>$results];
        }
        else $arr = ["response"=>"unsuccess","message"=>"No users found for the search. ".$database->error()];
}
else  $arr = ["response"=>"unsuccess","message"=>"Bad request !"];

echo json_encode($arr);
?>

Matched search response will returned the status, row count and the result in JSON format.

Likewise, we can create a simple REST API using PHP/MySQL for our cross-platform applications to communicate between the database and the application. This is just an example only. To use this in a production application, we need to think about it’s security and many more things.

You can download this source files from my Github: https://github.com/lahirutm/REST-API-php-mysql

Bootstrap 4 Login Page – PHP/MySQL

Here i have created a login page where user can enter their email address and password. When user submit the form, inputs will be verified against the credentials stored in the database, if the email and password match, the user is authorized and granted. Otherwise it will display error message.

You would need database connection to connect to MySQL database.

I have already posted a post about creating a database class for PHP/MySQL. I would suggest you to go through the previous post PHP/MySQL Database Class before following this.

login.php

Let’s create a file named “login.php” and place the following code. This file contains php scripts and HTML code for the login page. Here i have fetched the user from the database according to the entered username and compared the password hash in the database with the entered password’s hash (I have used md5 password hashing method). If both hashes are exactly same, register user id in the session and redirect to the index.php page.

<?php
require('class.database.php');

if(isset($_POST['submit'])){
	if(isset($_POST['username'])){
		if(isset($_POST['password'])){
			$username = $database->escape($_POST['username']);
			$password = $database->escape($_POST['password']);

			$sql = "SELECT * FROM users WHERE username='$username'";
			$results = $database->select($sql);
			if(is_array($results) && count($results)>0){
				$password_hash = $results[0]['password'];
				if($password_hash==md5($password)){
					// Username & password correct
					session_start();
					$_SESSION['user_id'] = $results[0]['id'];
					header('location:index.php');
				}
				else $ermsg = "Password incorrect !";
			}
			else $ermsg = "User not found !";
		}
		else $ermsg = "Password required !";
	}
	else $ermsg = "Username required !";
}
?>
<!DOCTYPE html> 
<html lang="en"> 
<head> <!-- Required meta tags --> 
  <meta charset="utf-8"> 
  <meta name="viewport" content="width=device-width, initial-scale=1, shrink-to-fit=no"> <!-- Bootstrap CSS --> 
  <link rel="stylesheet" href="https://maxcdn.bootstrapcdn.com/bootstrap/4.0.0/css/bootstrap.min.css" integrity="sha384-Gn5384xqQ1aoWXA+058RXPxPg6fy4IWvTNh0E263XmFcJlSAwiGgFAW/dAiS6JXm" crossorigin="anonymous">
  <!--Fontawesome CDN-->
  <link rel="stylesheet" href="https://use.fontawesome.com/releases/v5.3.1/css/all.css" integrity="sha384-mzrmE5qonljUremFsqc01SB46JvROS7bZs3IO2EmfFsd15uHvIt+Y8vEf7N7fWAU" crossorigin="anonymous">
  <title>Login</title> 
</head> 
<body> 


<div class="container">
		<?php 
		if(isset($ermsg) && !empty($ermsg)) {
			echo '<div class="alert alert-danger" role="alert">'.$ermsg.'</div>';
		}
		?>
	<div class="d-flex justify-content-center h-100">
		<div class="card">
			<div class="card-header">
				<h3>Login</h3>
			</div>
			<div class="card-body">
				<form method="post">
					<div class="input-group form-group">
						<div class="input-group-prepend">
							<span class="input-group-text"><i class="fas fa-user"></i></span>
						</div>
						<input type="text" name="username" class="form-control" placeholder="username">
						
					</div>
					<div class="input-group form-group">
						<div class="input-group-prepend">
							<span class="input-group-text"><i class="fas fa-key"></i></span>
						</div>
						<input type="password" name="password" class="form-control" placeholder="password">
					</div>
					<div class="form-group">
						<input type="submit" name="submit" value="Login" class="btn float-right login_btn">
					</div>
				</form>
			</div>
		</div>
	</div>
</div>


  <!-- Optional JavaScript --> <!-- jQuery first, then Popper.js, then Bootstrap JS --> 
  <script src="https://code.jquery.com/jquery-3.2.1.slim.min.js" integrity="sha384-KJ3o2DKtIkvYIK3UENzmM7KCkRr/rE9/Qpg6aAZGJwFDMVNA/GpGFF93hXpG5KkN" crossorigin="anonymous"></script> 
  <script src="https://cdnjs.cloudflare.com/ajax/libs/popper.js/1.12.9/umd/popper.min.js" integrity="sha384-ApNbgh9B+Y1QKtv3Rn7W3mgPxhU9K/ScQsAP7hUibX39j7fakFPskvXusvfa0b4Q" crossorigin="anonymous"></script> 
  <script src="https://maxcdn.bootstrapcdn.com/bootstrap/4.0.0/js/bootstrap.min.js" integrity="sha384-JZR6Spejh4U02d8jOt6vLEHfe/JQGiRRSQQxSfFWpi1MquVdAyjUar5+76PVCmYl" crossorigin="anonymous"></script> 
</body> 
</html>


After successful login, it will display a simple index.php page with the logout button for logout when needed.

index.php

<?php 
session_start();
// if the user is not logged in, then redirect to the login page
if(!isset($_SESSION["user_id"])){
    header("location:login.php");
    exit();
}
?>
<!DOCTYPE html>
<html lang="en">
  <head>
    <!-- Required meta tags -->
    <meta charset="utf-8">
    <meta name="viewport" content="width=device-width, initial-scale=1, shrink-to-fit=no">

    <!-- Bootstrap CSS -->
    <link rel="stylesheet" href="https://maxcdn.bootstrapcdn.com/bootstrap/4.0.0/css/bootstrap.min.css" integrity="sha384-Gn5384xqQ1aoWXA+058RXPxPg6fy4IWvTNh0E263XmFcJlSAwiGgFAW/dAiS6JXm" crossorigin="anonymous">

    <title>Simple Bootstrap4  - Login PHP/MySQL</title>
  </head>
  <body>
    <h1>Login Successful !</h1>
    <h2>
    <a href="logout.php">
    <button class="btn btn-warning">Logout</button>
    </a>
    </h2>
    <!-- Optional JavaScript -->
    <!-- jQuery first, then Popper.js, then Bootstrap JS -->
    <script src="https://code.jquery.com/jquery-3.2.1.slim.min.js" integrity="sha384-KJ3o2DKtIkvYIK3UENzmM7KCkRr/rE9/Qpg6aAZGJwFDMVNA/GpGFF93hXpG5KkN" crossorigin="anonymous"></script>
    <script src="https://cdnjs.cloudflare.com/ajax/libs/popper.js/1.12.9/umd/popper.min.js" integrity="sha384-ApNbgh9B+Y1QKtv3Rn7W3mgPxhU9K/ScQsAP7hUibX39j7fakFPskvXusvfa0b4Q" crossorigin="anonymous"></script>
    <script src="https://maxcdn.bootstrapcdn.com/bootstrap/4.0.0/js/bootstrap.min.js" integrity="sha384-JZR6Spejh4U02d8jOt6vLEHfe/JQGiRRSQQxSfFWpi1MquVdAyjUar5+76PVCmYl" crossorigin="anonymous"></script>
  </body>
</html>


logout.php

This uses for clear the login session we created and destroy all other sesions by destroying the session and redirect back to the login page.

<?php 
session_start();
// Unset all session variables
$_SESSION = array();
// Destroy the session.
session_destroy();
// Redirect to the login page
header("location:login.php");
exit();
?>

Download the complete source code sample database from my Github: https://github.com/lahirutm/Bootstrap-4-Login-Page—PHP-MySQL

NodeMCU ESP8266

NodeMCU is a low-cost open source IoT platform. It initially included firmware which runs on the ESP8266 Wi-Fi SoC from Espressif Systems, and hardware which was based on the ESP-12 module. Later, support for the ESP32 32-bit MCU was added.

NodeMCU Development board is featured with wifi capability, analog pin, digital pins and serial communication protocols.

NodeMCU with Arduino IDE

We can develop applications on NodeMCU using Arduino development environment. This makes easy for Arduino developers than learning new language and IDE for NodeMCU.

When we write and compile code using Arduino IDE, ESP8266 tool chain in background creates binary firmware file of the code. And when we upload it to the NodeMCU, it will flash whole NodeMCU firmware with newly generated binary firmware code.


Arduino Nano

The Arduino Nano is one of the smallest and yet most exciting breadboard-friendly boards available on the market today. It’s become exceptionally popular with beginner programmers thanks to its excellent functionality and the sheer variation of potential applications. Based on the ATmega328P, this tool is fantastic for those who wish to improve their programming skills and create some interesting and unusual projects. While the item does not come with a DC power pack, it benefits from a mini-USB cable for power, and that means you can use it with any PC or laptop device.