Growatt Inverter Client App – Java Client

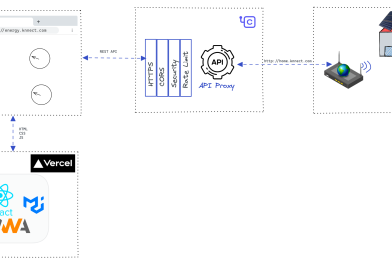
Java Client for the Growatt Inverter

This Java application currently supports 3 main actions.

A1) Notify when the grid voltage is 0v (i.e. Power cut)

A2) Change power input priority (SUB / SBU)

A3) Change battery charging priority (Solar Only / Solar Priority)

A1) Notify when the grid voltage is 0v (i.e. Power cut).

Currently, the Growatt mobile app does not have any notification mechanism to alert when the grid power goes away. This app uses an ugly hack to achieve that up to some level.

The application keeps polling (once every 5 minutes) the Growatt cloud and checks if the Grid voltage is 0v. If it is, it fires a configured Gmail webhook which sends a chat message to the user. Since the Datalogger only uploads data once every 5 minutes, we can’t get an accuracy higher than 5 minites even if we change the app to run more frequently.

This will also send a power status chat every day at 7 AM to let you know that the app is running properly.

Note: Please don’t use this action unless you really need it, as this introduces considerable traffic to the Growatt cloud.

A2) Change power input priority (SUB / SBU)

This can be used to change power input priority of the inverter automatically, based on a time schedule.

This is written as a test case so that it can be automated using a Git Action workflow. Have a look at the Github workflow files in this repo.

A3) Change battery charging priority (Solar Only / Solar Priority)

This can be used to change the battery charging priority of the inverter automatically.

This is also written as a test case.

How to run?

  1. Configure authentication details in the Configurations.java file.
  2. To run #A1, build the repo and simply run the main method of the Monitor.java class.
  3. To run #A2 manually, you can use the below command.
mvn clean install -P change-settings -Dtest="MonitorTest#testOutputChangeToSUB"

or

mvn clean install -P change-settings -Dtest="MonitorTest#testOutputChangeToSBU"

To automate #A2, create a private git clone of this repo (as you’re configuring your credentials in step 1). Change cron jobs based on your requirement.

  1. To run #A3 manually, you can use the below command.
mvn clean install -P change-settings -Dtest="MonitorTest#testChargingChangeToSolarOnly"

or

mvn clean install -P change-settings -Dtest="MonitorTest#testChargingChangeToSolarPriority"


Special Thanks to bhathiya/growatt-inverter-client

Sako Isun Inverter USB Driver + Monitoring

This is an Solar inverter monitoring and controlling system for hybrid inverters, Following are the main components in the system.

  • Solar Inverter driver program to communicate with USB serial port (Python)
  • Python Flask based REST API to expose the data
  • ReactJS based web portal (PWA) for monitoring and controlling the inverter

Tested Solar inverters

Currently we have tested this on Sako Isun 3KW.

Supported compute devices

  • Raspberry pi
  • Orange pi
  • Any Unix device

Hardware setup

  • Use the USB cable provided with the inverter or any appropriate USB cable
  • Connect the USB cable to any of the supported device
  • Install the pre-requisite mentioned in the following install steps
  • Run the tools/check-inverter.py script to connection between inverter and the compute device
  • For any issues check the Troubleshoot section

How it works

Most of the Hybrid(Chinees) inverters comes with the following Serial interface

Bus 001 Device 002: ID 0665:5161 Cypress Semiconductor USB to Serial

For this VendorID and ProductID there are several UPS and inverter devices using this serial com device. But this device had no drivers for Raspberry pi, So when the inverter is connected to a Raspberry pi(or similar) compute device , it detects as a USB block storage device

/dev/usb/hiddev0

not as a USB serial communication device.

i:e

/dev/ttyS0 or /dev/USB0

To establish communication between the inverter and the compute device we had to use pyUSB approach described in here. For the basic working principles of Inverter – Compute device (Raspberry pi) communication check the above article.

Another important piece of the puzzle was to find out the communication protocol. This document from a random generous Czech inverter site.

Without this, Decoding the values sent from inverter was a challenge

and the meanings of

  • QPIGS: Device general status parameters inquiry

and

  • QMOD: Device Mode inquiry

were like greek!

Once the communication is established it’s was just a matter of routing the data to client application (React app) to present the data.

We use Flask to implement REST API and ReactJS, MUI , React Query in the UIs.

Install

Most of the Raspberry pi & Orange Pi variations doesn’t come with pip pre-installed, Hence we have to run this

  • sudo apt-get install python3-pip

Install the Python USB communication library

  • python3 -m pip install pyusb

This is required for the following crc16 library

  • sudo apt-get install python3-dev

CRC16 is used to generate the 2 byte CRC, CRC is a way of detecting accidental changes in data storage or transmission

| Note: This only works upto python 3.9 versions, If you have a latest version of Python 3.10+, This will not work

  • python3 -m pip install crc16

Add a Udev rule as shown below, This is required to allow communicating with the USB device for none-sudoers users. Example file is given in

references/99-knnect.rules

in this repo

  • sudo vim /etc/udev/rules.d/99-.rules

Restart the Udev admin to apply the changes

  • sudo udevadm control –reload-rules && sudo udevadm trigger

Accessing from anyway

Currently this only support monitoring through the local network, If you want to monitor or control the device through internet, Then you need to expose the APIs through Choreo (It’s free) like API proxy service or Buy a Blynk subscription and publish data to blynk.

Troubleshoot

  • Use
sudo lsusb

to check whether the Serial Communication device has been detected by the operating system if so it show show as

Bus 001 Device 002: ID 0665:5161 Cypress Semiconductor USB to Serial

in the output of lsusb command

Special Thanks To (tmkasun/solar-hybrid-inverter-monitor)