Electron Desktop App – Camera Access

Electron is a good application building platform for Desktops (Windows, Mac & Linux). It is very easy to access local PC resources like camera in a simple local HTML file.

In this main.js file we created a electron browser and load simple java script file preload.js to access camera stream and passed to html5 video element.

main.js

const {app, BrowserWindow} = require('electron');
const path = require('path');

let mainWindow;

// This method will be called when Electron has done everything
// initialization and ready for creating browser windows.
app.on('ready', function() {
  // Create the browser window.
  mainWindow = new BrowserWindow({
    width: 800, 
    height: 600, 
    webPreferences: {
      preload: path.join(__dirname, "preload.js")
    }
  });

  // and load the index.html of the app.
  mainWindow.loadFile('index.html');

  // Emitted when the window is closed.
  mainWindow.on('closed', function() {
    // Dereference the window object, usually you would store windows
    // in an array if your app supports multi windows, this is the time
    // when you should delete the corresponding element.
    mainWindow = null;
  });
});


// Quit when all windows are closed.
app.on('window-all-closed', function() {
  if (process.platform != 'darwin')
    app.quit();
});

preload.js

navigator.mediaDevices.getUserMedia({video: true})
  .then(function(stream) {
    document.getElementById('camera').srcObject = stream;
  }).catch(function() {
    alert('could not connect stream');
  });

Download full source from here https://github.com/lahirutm/Electron-Camera-Access  and run

npm install

to install dependencies and libraries.

then

npm start

to run the sample. Then you camera stream will display in the desktop app made using Electron.

Desktop App using HTML, CSS & JavaScript

Electron is an open source library developed by GitHub for building cross-platform desktop applications with HTML, CSS, and JavaScript. Electron accomplishes this by combining Chromium and Node.js into a single runtime and apps can be packaged for Mac, Windows, and Linux.

Before proceeding with this tutorial, you should have a basic understanding of Javascript and HTML. You also need to know about a few native Node.js

Electron enables you to create desktop applications with pure JavaScript by providing a runtime with rich native APIs.

To get started with developing using the Electron, you need to have Node and npm installed.

First download sample app from this URL. https://github.com/lahirutm/electron-test-apps

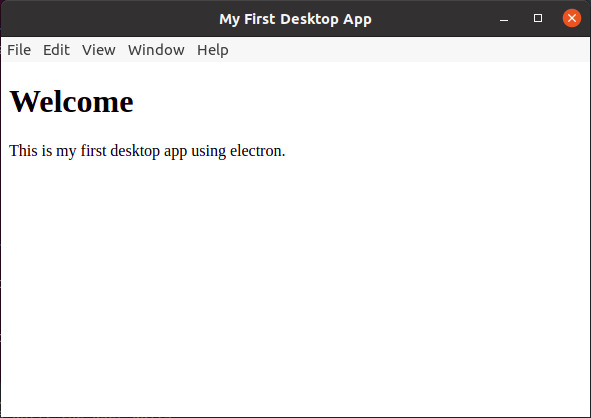
According to the main.js file, we open index.html file in a electron browser window.

const { app, BrowserWindow, ipcMain } = require("electron");

let mainWindow;

function createWindow() {
  mainWindow = new BrowserWindow({
    width: 800,
    height: 600
  });

  mainWindow.loadFile("index.html");
}

// This method will be called when Electron has finished
// initialization and is ready to create browser windows.
// Some APIs can only be used after this event occurs.
app.whenReady().then(() => {
  createWindow();

  app.on("activate", function () {
    // On macOS it's common to re-create a window in the app when the
    // dock icon is clicked and there are no other windows open.
    if (BrowserWindow.getAllWindows().length === 0) createWindow();
  });
});

// Quit when all windows are closed, except on macOS. There, it's common
// for applications and their menu bar to stay active until the user quits
// explicitly with Cmd + Q.
app.on("window-all-closed", function () {
  if (process.platform !== "darwin") app.quit();
});


To run this app open a terminal & run below command to install dependencies & libraries.

npm install

then run this to start the example app.

npm start

Then example app will open.

NODE.JS SMPP Server & Client

Introduction

This is a complete implementation of SMPP v5.0 in node.js, with support for custom commands and TLVs.

SMPP v5.0, by design, is backward compatible with v3.4, so you would be able to use this module with 3.4 implementations. Even you can use this module with 3.3 implementations as far as you don’t use TLV parameters and don’t bind in transceiver mode.

The name of the methods and parameters in this implementation are equivalent to the names defined in SMPP specification. So get a copy of SMPP v5.0 Specification for a list of available operations and their parameters.

Creating a SMPP session

var smpp = require('smpp');
var session = smpp.connect({
	url: 'smpp://example.com:2775',
	auto_enquire_link_period: 10000,
	debug: true
}, function() {
	session.bind_transceiver({
		system_id: 'YOUR_SYSTEM_ID',
		password: 'YOUR_PASSWORD'
	}, function(pdu) {
		if (pdu.command_status === 0) {
			// Successfully bound
			session.submit_sm({
				destination_addr: 'DESTINATION NUMBER',
				short_message: 'Hello!'
			}, function(pdu) {
				if (pdu.command_status === 0) {
					// Message successfully sent
					console.log(pdu.message_id);
				}
			});
		}
	});
});

Creating a SMPP server

var smpp = require('smpp');
const utf8 = require('utf8');


var server = smpp.createServer(function(session) {

	console.log("\nIncoming session %s", session);

	session.on('bind_transceiver', function(pdu) {
		// we pause the session to prevent further incoming pdu events,
		// untill we authorize the session with some async operation.
		console.log("\nPDU bind_transceiver %s",pdu);
		session.pause();

		checkAsyncUserPass(pdu.system_id, pdu.password, function(err) {
			var system_id = pdu.system_id;
			console.log("\nAtemting to connect with system_id %s",system_id);

			if (err) {
				session.send(pdu.response({
					command_status: smpp.ESME_RBINDFAIL
				}));
				session.close();
				console.log("\nAuth Failed for id %s password %s \n",pdu.system_id,pdu.password);
				return;
			}
			session.send(pdu.response());
			session.resume();

			session.on('submit_sm', function(pdu) {
				var destination_addr = pdu.destination_addr;
				var short_message = pdu.short_message.message;
				if(pdu.message_payload && pdu.message_payload.length>0) {
					console.log("Payload %s \n",pdu.message_payload);
					if(pdu.message_payload.message) short_message = pdu.message_payload.message;
				}
				if(destination_addr && destination_addr.length==11 && destination_addr.substr(0,2)==="94"){
					if(short_message && short_message.length>0){
						destination_addr = "0" + destination_addr.substr(-9);

						let sms = utf8.decode(short_message);
						let char_count = sms.length;
						let no_of_sms = Math.ceil(char_count / 160);

						var msgid = "1234567890"; // generate a unique number here

						var message_id = msgid.padStart(10, '0');
						session.send(pdu.response({
							message_id: message_id
						}));

						if (pdu.registered_delivery) {
							send_delivery_reports(pdu, session, system_id, message_id);
						}

						console.log("\nSMS Sent, msg id %s",msgid);
						
					}
					else {
						console.log("\nInvalid message content %s \n", short_message);
					}
				}
				else {
					console.log("\nInvalid destination number %s \n", destination_addr);
				}

				console.log("\nPDU bind_transceiver :: submit_sm %s",pdu);
			});

			session.on('unbind', function(pdu) {
				session.send(pdu.response());
				session.close();
				console.log("\nPDU bind_transceiver :: unbind %s",pdu);
			});

			session.on('enquire_link', function(pdu) {
				session.send(pdu.response());
				console.log("\nPDU bind_transceiver :: enquire_link %s",pdu);
			});

			session.on('deliver_sm_resp', function(pdu) {
				console.log("\nPDU bind_transceiver :: deliver_sm_resp for %s \n %s",system_id, pdu);
			});
		});
	});

	session.on('bind_transmitter',function (pdu) {

		session.pause();
		checkAsyncUserPass(pdu.system_id, pdu.password, function(err) {
			var system_id = pdu.system_id;
			console.log("\nAtemting to connect with system_id %s",system_id);

			if (err) {
				session.send(pdu.response({
					command_status: smpp.ESME_RBINDFAIL
				}));
				session.close();
				console.log("\nAuth Failed for id %s password %s \n",pdu.system_id,pdu.password);
				return;
			}
			session.send(pdu.response());
			session.resume();


			session.on('submit_sm', function(pdu) {
				
				var destination_addr = pdu.destination_addr;
				var short_message = pdu.short_message.message;
				if(pdu.message_payload) {
					console.log("Payload %s \n",pdu.message_payload);
					if(pdu.message_payload.message) short_message = pdu.message_payload.message;
				}
				if(destination_addr && destination_addr.length==11 && destination_addr.substr(0,2)==="94"){
					if(short_message && short_message.length>0){
						destination_addr = "0" + destination_addr.substr(-9);

						let sms = utf8.decode(short_message);
						let char_count = sms.length;
						let no_of_sms = Math.ceil(char_count / 160);

						var msgid = "1234567890"; // generate a unique number here
						var message_id = msgid.padStart(10, '0');
						session.send(pdu.response({
							message_id: message_id
						}));

						if (pdu.registered_delivery) {
							send_delivery_reports(pdu, session, system_id, message_id);
						}

						console.log("\nSMS Sent, msg id %s",msgid);
					}
					else {
						console.log("Invalid message content %s \n", short_message);
					}
				}
				else {
					console.log("\nInvalid destination number %s \n", destination_addr);
				}

				console.log("\nPDU bind_transmitter :: submit_sm %s", pdu);
			});

			session.on('unbind', function(pdu) {
				session.send(pdu.response());
				session.close();

				console.log("\nPDU bind_transmitter :: unbind %s", pdu);
			});

			session.on('enquire_link', function(pdu) {
				session.send(pdu.response());
				
				console.log("\nPDU bind_transmitter :: enquire_link %s", pdu);
			});
		});

		console.log("\nPDU bind_transmitter %s",pdu);
	});

	session.on('bind_receiver',function (pdu) {
		
		session.pause();
		checkAsyncUserPass(pdu.system_id, pdu.password, function(err) {
			var system_id = pdu.system_id;
			console.log("\nAtemting to connect with system_id %s",system_id);

			if (err) {
				session.send(pdu.response({
					command_status: smpp.ESME_RBINDFAIL
				}));
				session.close();
				console.log("\nAuth Failed for id %s password %s \n",pdu.system_id,pdu.password);
				return;
			}
			session.send(pdu.response());
			session.resume();

			session.on('deliver_sm_resp', function(pdu) {
				
				console.log("\nPDU bind_receiver :: deliver_sm_resp %s", pdu);
			});

			session.on('unbind', function(pdu) {
				session.send(pdu.response());
				session.close();

				console.log("\nPDU bind_receiver :: unbind %s", pdu);
			});

			session.on('enquire_link', function(pdu) {
				session.send(pdu.response());

				console.log("\nPDU bind_receiver :: enquire_link %s", pdu);
			});
		});

		console.log("\nPDU bind_receiver %s",pdu);
	});
});
server.listen(2775);


function checkAsyncUserPass(system_id, password, callback) {

	// check & validate system_id and password from your authentication mechanism
	var err = false; // set false for testing

	if(err) {
		callback(1); // error
		console.log("\nLogin failed for system_id: %s", system_id);
	}
	else {
		callback(0); // no error
		console.log("\nUser %s successfully logged in.", system_id);
	}
}


function send_delivery_reports(pdu, session, system_id, message_id){
	
	var nsms = "" + 1;
	nsms = nsms.padStart(3, '0');

	var m = new Date();
	var c_year = "" + m.getFullYear();
	var c_month = "" + (m.getMonth()+1);
	var c_date = "" + m.getDate();
	var c_hour = "" + m.getHours();
	var c_minute = "" + m.getMinutes();
	var second = "" + m.getSeconds();

	var current_time = c_year+c_month+c_date+c_hour+c_minute+second;

	session.deliver_sm({
		esm_class: 4,
	    source_addr: pdu.destination_addr,
	    destination_addr: pdu.source_addr,
	    short_message: {
	    	message: 'id:'+message_id+' sub:'+nsms+' dlvrd:'+nsms+' submit date:'+current_time+' done date:'+current_time+' stat:DELIVRD err:0 text:@'
	    },
	    receipted_message_id: message_id,
	    user_message_reference: message_id
	});

	console.log("\nsend_delivery_report DELIVRD :: deliver_sm pdu sent for %s",system_id);
}


It’s very important to listen for session errors, not listening for error events will terminate the program.

Project is forked from: https://github.com/farhadi/node-smpp

To see the full source code and implementation guide, visit: https://github.com/lahirutm/node-smpp
Zip directory using Node.JS

Archiving a file/folder using nodejs is very simple. I have used nodejs archiver library to zip directory and fs library to get the file information in this post.

const fs = require('fs');
var archiver = require('archiver');

function zip_directory(filename, copyFrom, copyToPath){
    var copyTo = copyToPath + filename;

    if(!fs.existsSync(copyToPath)){
        fs.mkdirSync(copyToPath);
    }

    var output = fs.createWriteStream(copyTo);
    var archive = archiver('zip', {
      zlib: { level: 9 } // Sets the compression level.
    });

    output.on('close', function () {
        console.log(`\n<< ARCHIVE LOG: TOTAL BYTES ${archive.pointer()} >>`);
        console.log(`\n<< ARCHIVE LOG: archiver has been finalized and the output file descriptor has closed. >>`);
    });

    output.on('end', function() {
	  console.log(`\n<< ARCHIVE LOG: END : Data has been drained. >>`);
	});

    archive.on('warning', function(err) {
	  if (err.code === 'ENOENT') {
	    console.log(`\n<< ARCHIVE LOG: ENOENT ${err} >>`);
	  } else {
	    console.log(`\n<< ARCHIVE LOG: WARNING ${err} >>`);
	  }
	});

    archive.on('error', function(err){
        console.log(`\n<< ARCHIVE LOG: Error : ${err} >>`);
    });

    try {
        archive.pipe(output);
        archive.directory(copyFrom, { name: filename });
        archive.finalize();
    } catch (err) {
        console.log(`\n<< ARCHIVE LOG: Error : ${err} >>`);
    }
}


zip_directory('myzipfile.zip', '/home/', '/opt/zipfiles/');


Note: Should install required packages as well as declare require things in code.

Tagged : / /

NodeJs Http Server (Web Server)

Making a simple HTTP server in Node.js is very simple. Node.js provides extremely easy-to-use HTTP APIs, a simple web server.

Let’s take a look at a very simple example:

const http = require('http');

const http_port = 8000;

// Instantiate the HTTP server.
const httpServer = http.createServer((req, res) => {
    if (req.method == 'POST') {
        var jsonString = '';

        req.on('data', function (data) {
    	    try {
                console.log(data.toString());
    	    }
    	    catch(err) {
    		console.log(err);
    	    }
        });

      	req.on('error', (err) => {
            // This prints the error message and stack trace to `stderr`.
            console.log("POST ERROR \n" + err.stack);
      	});

        req.on('end', function () {
             console.log('POST Request ended here.');
        });
    }
    
    res.writeHead(200);
    res.end();
    console.log('Response ended here. \n ');
});


httpServer.listen(http_port, () => {
  console.log("Web server is listening on port %s \n", http_port);
});

Save this in a file called server.js – run node server.js, and your program  will hang there… it’s waiting for connections to respond to, so you’ll have to give it one if you want to see it do anything. If everything has been set up correctly, you should see your server’s request & response log.

Let’s take a more in-depth look at what the above code is doing. Function in http.createServer takes a request object and a response object as parameters.

The request object contains things such as the requested URL, Request Method and data.

The response object is how we send the headers and contents of the response back to the user making the request. Here we return a 200 response code (signaling a successful response) with empty body. Other headers, such as Content-type, would also be set here.

The listen method, which causes the server to wait for incoming requests on the specified port – 8000, in this case.

There you have it – your most basic Node.js HTTP server.